Recently, I set up Eclipse* to work with JUnit, and it took more effort than I anticipated. I’m recording the steps here so that I – or anybody else – can refer to it later if the need arises.
Here’s the environment I used:
| OS | Debian 9 64-bit |
| JDK | openjdk version “1.8.0_141” |
| Eclipse | Oxygen Release (4.7.0) |
| JUnit | version 4.12 |
| Hamcrest | version 1.3 |
The above packages were at their latest versions when I wrote this article.
I assume you have already installed Eclipse and JDK. Here are the rest of the steps:
Method 1: The Easy Way (recommended)
This may not work for everyone, but it definitely worked for me.
- In Eclipse, create a Java project if you haven’t already done so.
- Create the class you want to test.
- Right click on your project directory in the package explorer.
- Hover your mouse over
New, then selectJUnit Test Case. - Fill in the necessary information in the dialog that opens up. Be sure to enter the name of the class you want to test (the one you created in step 2) in the
Class under test:field. - Click
Finish.
You should now have a new Java class populated with stubs for testing functions of the class you created in step 2 above.
Method 2: The Hard Way
- Download
junitJAR file. - Download
hamcrest-coreJAR file. This is the step everybody skips and eventually trips up. According to Hamcrest wiki here, “Hamcrest is a framework for writing matcher objects allowing ‘match’ rules to be defined declaratively”. JUnit uses Hamcrest. - Add JUnit and Hamcrest JAR file to your project as external libraries:
-
In Eclipse, create a Java project if you haven’t already done so.
-
Right click on your project directory in the package explorer.
-
Click
Properties. -
Click
Java Build Pathon the left pane in the window that open up (see screenshot below). -
Click
Librariestab on the right pane. -
Click
Add External JARs...button on the right. A file explorer should open up. Browse to the location where you saved the JUnit JAR file, and select the JAR file. -
Click
Apply.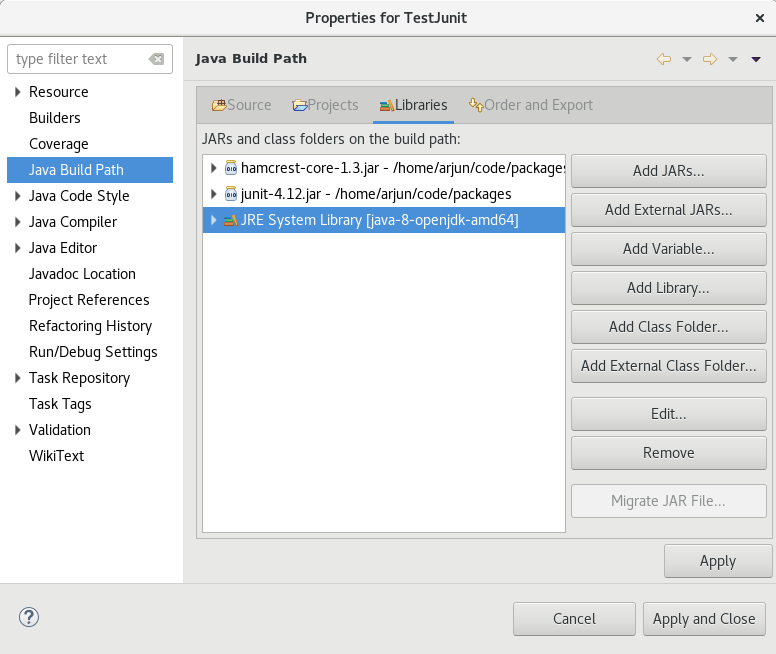
Add JUnit
-
Repeat the procedure to add Hamcrest JAR file, and close the window.
- You’re done! Start coding!
Further Reading
- Hamcrest official website.
- Stackoverflow: java.lang.NoClassDefFoundError: org/hamcrest/SelfDescribing.
- JUnit 4 download page on GitHub.
- Tutorialspoint: JUnit – Plug with Eclipse.
* I know Eclipse is not the best IDE out there. My pick would be IntelliJ IDEA, but for now I’m stuck with Eclipse due to reasons that are not relevant here.