As I discovered the hard way, setting up Visual Studio to connect to a MySql database can be tricky. And becuase I had to go through pages and pages of StackOverflow for what turned out to be a trivial solution in retrospect, I figured I’d pen down the whole process.
Note that, I had Windows 8.1 installed as a VirtualBox guest OS in Linux.
Install Visual Studio (if you haven’t already)
Before you do anything else, get your copy of Visual Studio from the official website. The exact version you want to use depends on what all you plan to do with Visual Studio. Keep in mind that not all versions of Visual Studio are free, and some are available for free only for a limited trial period. As for me, I got myself the Visual Studio Community 2013 – ticked all the right boxes. I didn’t go for the latest version as it was giving me minor hiccups.
Get MySql Packages for Visual Studio and .Net
You’re going to have to install a couple of packages in Windows so that your program can connect to the MySql database. Go to MySql’s official website and download and install the following two packages:
It’s best if you install the latest available versions of both the packages. Keep a note of the installation directory of both the above packages.
Setup your database
The packages you need are:
- Apache web server
- MySQL database
- PhpMyAdmin (Optional. Highly recommended)
The way you install these depends on your specific platform. I leave it to you to figure that out. For most linux distributions, install the LAMP stack using the package manager on your system. That should give you Apache and MySQL.
If you’re on Windows, try installing WAMP, XAMP or some viable alternative (I have never really used WAMP/XAMP, so I have limited knowledge on that).
Optionally, if somebody from your local network has Apache and MySql installed, you can use of those over the network instead of installing them locally. In my case, Apache and MySql were already installed on my host Linux machine, and I used that instead of installing everything in my guest Windows OS. This is similar to connecting to a database over the network.
PhpMyAdmin is pretty-much a GUI for dealing with databases on your system. I believe it’s included by default in WAMP. Linux users however might have to explicitly install phpMyAdmin.
You’re now ready to start coding MySql applications using Visual Studio!
If you are connecting to a remote MySql database (ie., over the network), there’s this one last step that should be done on the server side.
(If you’re not connectiong to a remote MySql database, skip to the next section).
Change the bind-address of MySql if you haven’t previously done so. In the simplest terms, the bind address tells mysql where to listen to. If you’re unsure of what bind address you should choose, you may use 0.0.0.0 that allows any computer on your network to connect to the database. This should suffice for developmental purposes at least. I recommend you contact your system-administrator/DBA for more advice on this.
To change the bind-address of MySql in Linux, open /etc/mysql/my.conf. For windows, go through the WAMP menu on the status-bar to locate this file.
Go through the file, and you should eventually find the line “bind-adress”. Change the whole line to
bind-address = 0.0.0.0
Restart MySql once the bind-address has been changed. Keep a note of the IP address of the system where your database server resides; this address is necessary when connecting to the database from Visual Studio.
Now you’re all set to establish connection from Visual Studio to a MySql database on a remote server!
I’ll walk you through creating a sample C# code in Visual Studio that connects to a database in Visual Studio.
Sample Database Connectivity Program
Add a connection (GUI method)
First up, you would need to set up a connection to the database if you want to do anything practical. There are several methods to accomplish this. Here, I’m going to mention one of the ways.
For that, click the ‘Server Explorer’ on your screen. If you can’t find it, click on ‘View’ in the menustrip, and select the ‘Server Explorer’ option.
From the ‘Server Explorer’ option, search around until you find an option like “Add Database Connection”. Click on it.
A simple menu like the one shown below would appear.
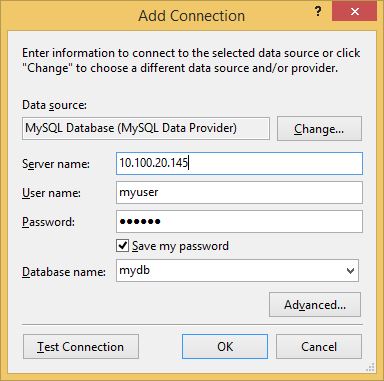
Fill up the data.
- Set the
Data sourceto MySQL Database - If the server resides in your own machine, type “localhost” as the
Server name.Else, type the IP address of the remote server. - If your mysql database does not need a password (the default setting in WAMP AFAIK), leave the password field blank.
- Choose your database from the drop-down combo-box. Once you enter the servername and login credentials, the database names would have been automatically populated into the combo-box for choosing the database.
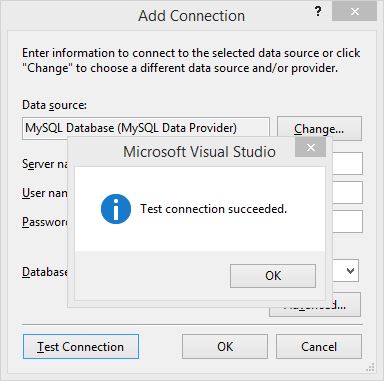
Finally, press the Test Connection button to ensure that the connection works. If everything went according to plan, you would see something like this:
Set up MySql Reference in your program
Next up, create a C# project in Visual Studio if you haven’t already done so.
For almost all projects that works with MySql database, you need to have access to certain libraries. The libraries would have come along with the MySql/Net Connector which you installed earlier.
On your project in the Solution Explorer pane, right click References, and choose Add Reference. Click on the browse button, and locate MySql.Data.dll. It will be in the installation directory of MySql/Connector installation directory.
I had done a default installation for the MySql/Net connector, and so the aforementioned .dll was in
C:\Program Files (x86)\MySQL\MySQL Connector Net 6.9.8\Assemblies\v4.0
This dll needs to be added as a reference in your Visual Studio project for you to make use of the MySql classes.
Keep in mind that, depending on your specific installation, there might be minor changes in the location of the .dll, or its exact path name. I leave it to your good judgement to figure out the exact file-path in your system.
Sample Code to test Database Connectivity.
Below is a sample program that connects to a database. The critical bit is conString, the value of which you’d get from the Properties panel when you (from the Server Explorer) click on the database connection you just created.
|
|
(In the conString above, replace the connection string with the values for your specific database.)
For more diverse and versatile methods on how you can create connection strings, check out https://www.connectionstrings.com/mysql/ .